Let’s take these Maple Butter Cookies you just baked to the next level with a fun and easy decorating twist!
Whenever I want to elevate a simple cookie without spending a lot of time, I turn to chocolate-melting wafers for a quick yet beautiful finish. This trick was one of the first things I shared on my blog, Dust, Dip, & Sprinkle, and it’s a total game-changer for beginners!
But if you’re not into chocolate or prefer your cookies as-is, don’t worry—I’ve got you covered! These Maple Butter Cookies are absolutely delicious all on their own. They’re rich, buttery, and have the perfect balance of sweetness, making them irresistible without anything extra.
In the video, I also show a few creative packaging ideas that will add a fun and personal touch for gift-giving or for any special occasion. Whether you’re gifting them for the holidays, a birthday, or just because, these ideas will make your cookies look as good as they taste!
Happy decorating (or not—either way, you’re in for a treat)!


Easy Decor for Maple Butter Cookies
Description
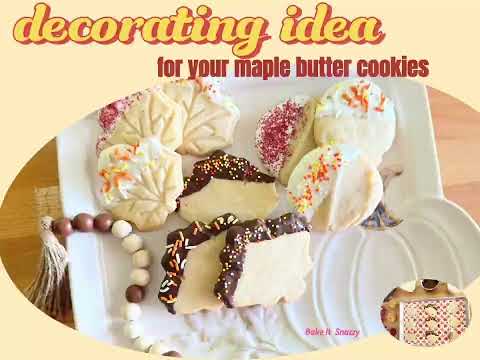
You may use any chocolate-melting wafers, candy melts, or almond bark of your choice. In the video, I show using Almond Bark (a chocolate confectionery coating), Ghirardelli melting wafers, and Stove & Company Sweet Shoppe melting wafers. I wanted to demonstrate that they all work well and taste great. Also, melting wafers come in a variety of colors depending on the brand. You may also use oil-based food color and add to white melting wafers or almond bark and create endless colors (if going this route do not attempt to use regular food coloring or food gels. It will ruin your chocolate, be sure food colors are oil-based).
Get creative with sprinkles. You can also sprinkle with nuts, crushed peppermint, etc.!
Ingredients
Packaging
Instructions
-
Prep to Melt
Place 6 oz (170g) of melting chocolate wafers OR 3 blocks of the Almond bark in a microwave-safe container.
Use a container with depth so you are able to dip. If container is too wide and shallow, you won't be able to dip the cookies.
-
Melt Your Chocolate
Place your container with the chocolate in the microwave and heat for 10 seconds. Remove from microwave and stir. Place it back in the microwave and heat for another 10 seconds. Remove from microwave and stir. Repeat if necessary but reduce heat time to 5 seconds until you chocolate is melted.
Stirring after each time you heat with help distribute the heat. It is best to heat a few seconds at a time until chocolate in melted. If you heat it for a longer period of time, you run the risk of scorching the chocolate and you will not be able to use it.
-
Dip and Sprinkle
Dip your cookie, give it a little shake to remove any excess chocolate. Place it on the pan and add your sprinkles.
Sprinkle them before you chocolate sets, If you wait too long to add the sprinkles, the chocolate may set and the sprinkles will not stick.
-
Set, Plate or Package
Let the chocolate completely set before setting it on a plate or packaging.
You can plate them on a festive plate for a special occasion.
You can package them using a goody bag or cellophane bag and seal them with a twist tie or ribbon.
They make cute gifts.